- Be sure to get all pertinent information ahead of time:
Terminals: Pick Port, Systech Port, and Baud Rate
Printers: Printer Number, Pick Port, Systech Port, and Baud Rate
- Add serial ports to the USER-COLDSTART in DM for terminals. On a new server, these DEV-MAKES are already in the coldstart and just need to be modified. If loading the server on site, a copy of the coldstart with serial dev-makes are on our Perf CD under TECH > DOCS.
- Connect the Systech to the local area network and click on START > PROGRAMS > Native Com > Port Server Utility.
- In the Port Utility Menu, a device should show up in the Step1 window with no IP Address. Double click on the area where the IP address should be and give the device an address. Our standard is 10.1.1.6 but the IP Address needs to match there internal IP scheme. Once done, close the Port Server Utility screen.
- Note: the following commands in the Terminal Server are lower case unless otherwise expressed.
FOR TERMINALS:
- Go into Accuterm and telnet to the Systech Terminal Server. Type in the password as user. Then type in admin and hit enter, and then the password for admin is admin. You should now be at a prompt that looks like this: [admin:1/1]
- Type in show port # and hit <ENTER>. (The # is the port number of the Systech terminal server port you are working on.) Note the configuration.
- Type in delete rtelnet # and hit <ENTER>. Type in show port # and hit <ENTER> and you will see the configuration has now been removed.
You can use the EXPLORER interface or the following commands.
(For EXPLORER interface see below.)
- Type in set custom C# # and hit <ENTER> (the “C” is capitalized and the # is the Systech port numbers both times.)
- You now have a series of prompts:
Authentication level = 1 <ENTER> no authentication (none)
Capabilities level = 1 <ENTER> (user)
Terminal Type = press <ENTER> (none or default)
Restart Delay = 2 <ENTER> (2)
Keyboard Hit = y <ENTER> (y)
Display Banner = n <ENTER>
1 Key Menu = n <ENTER>
Enter command for session 1 = telnet –t 10.1.1.1 8039 <ENTER>
(The above command is based upon their setup, the main machine may be something else and the port number 80## may vary.)
Another command? = n <ENTER>
Is this correct? = y <ENTER>
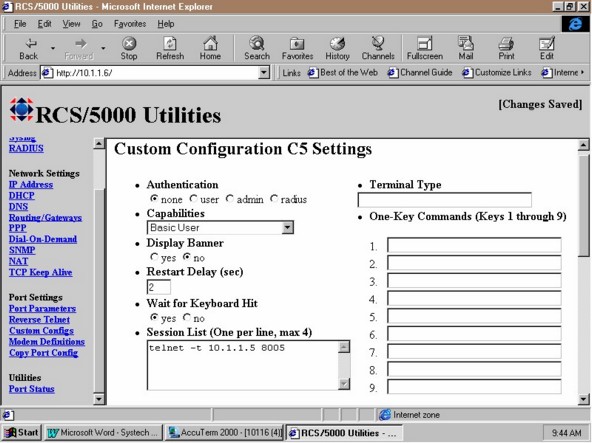
Here is the interface for EXPLORER under the Custom Configuration.
- You will do the above steps for the telnet ports only.
- You will be back at a prompt. [admin:1/1*] The asterisk means that you need to save something because you changed something. Type in save and hit <ENTER>.
- Type in show port # and hit <ENTER>. Be sure the configuration has been updated with C#.
- Also make sure to do a set speed # 19200 each of the ports.
- Do this for each of the terminals.
- In Accuterm, go to DM and create a DEV-MAKE for the new TELNET port. Update the User-Coldstart and add the dev-make in for each one. Example: dev-make -t telnet -n 35 -a "s,8035,\t" Be sure the \ is before the t the end of the line, otherwise you will not be able to nail ports. On a new server, these DEV-MAKES are already in the coldstart and just need to be modified. If loading the server on site, a copy of the coldstart with serial dev-makes are on our Perf CD under TECH > DOCS.
- Go back to the Systech Terminal Server in Accuterm and at the admin prompt type in expert and hit <ENTER>. At the expert prompt type in reboot and hit <ENTER>. The light will go amber and then green on the Systech device. It will take a minute for it to reboot. You could go to TCL on the main server and type in !PING 10.1.1.# and hit <ENTER> to see if it replies (the # is whatever the Systech server IP is). When it does reply it is rebooted.
FOR PRINTERS
- You need to be sure you know which port the printer is on(Pick and Systech), and which number the printer is in the system; also know the baud rate.
- Do a LISTPTR on the Main Machine in DM and find the above information for printer (s) number.
- Kill the printer in PICK (SP-KILL D#) and do a DEV-REMOV on the device. Remove the printer in the User-Coldstart.
- Printers on the Systech are Windows LPR Printers.
- Note: When doing LPR printing with multiple locations, port 515 must be opened up on the routers.
- Services: Note: Windows 2000 comes with the service already added. Once the Service is added, you need to load the latest service pack.
- The Server: The printer needs to be added on the server: START>SETTINGS> PRINTERS>ADD PRINTER. Check MY COMPUTER, NEXT, ADD PORT, highlight LPR PORT, click NEW PORT, place in the Systech the IP Address, type in: port6 (ßThe word PORT and the Systech port using the printer). Click CLOSE, NEXT, choose MFR of printer, choose the printer, give the Printer a name. Example: PRINTER_1 would be the printer name, next, click shared, next, and FINISH.
- The Systech: If there is an existing configuration on the Systech, then you will have to log in and set the Systech port numbers that are using LPR printing and
Type in: DELETE RTELNET XX (port#)
Set the baud rate: SET SP XX (port#) 9600
Clear existing config: DELETE DEFAULT XX(port#)
Set IG to yes: SET IG XX(port#) YES then SAVE<enter>.
- The D3 Side: A dev-make will need to be place in the Coldstart. Using the example above, It will read:
DEV-MAKE –T NTPRINTER –N 145 –A “PRINTER_1”
STARTPTR 1,1,0,S145 (S
Note: Always place these commands in the Coldstart first, then copy and paste them to activate them. This will alleviate any typos when the system is rebooted. Be sure the Coldstart is correct in its dev-make line; check and recheck for accuracy.
Installing LPR Printing if it does not show up for Windows 2000:
To add optional networking components
- Open Network and Dial-up Connections.
- On the Advanced menu, click Optional Networking Components.
- Do one of the following:
- To install all optional networking components, select the Management and Monitoring Tools, Networking Services, and Other Network File and Print Services check boxes, and then click Next.
- To install specific optional networking components, select its corresponding check box, and then click Details.
In Subcomponents of component, select the check boxes next to the components you want to install, and then click OK.
Notes
- To open Network and Dial-up Connections, click Start, point to Settings, and then click Network and Dial-up Connections.
Examples of optional networking components include Simple Network Management Protocol (SNMP), Simple TCP/IP Services, and Print Services for Unix.

