- Customer On-Line must be purchased first before installing. Please contact Perfection Software, Inc. Sales for pricing on PERF.CUST-ON-LINE. If you have made a purchase and are waiting on equipment please call to inquire on delivery.
- Schedule an appointment for installation.
- Determine where the PDA server will be and how the PDA will HotSync to the system (modem, serial and/or USB and if doing HotSync on home PC) then plug in the cradle or cable and connect the Palm OS device.
- Test to make sure VNC is working on the Palm Server, if not set it up with the customer.
- Load the PM Upgrade and setup Customer On-Line by going into PM then TCL and type ADD.COL.MENU <ENTER>. Return to the Main Menu and check to see if the Customer On-Line menu now appears in menu 10.6.
- Setup the Palm OS device, Palm Desktop and PDE. Use the Setup a PDA & PDA Server doc in the Tech folder on the Perfection Upgrade CD. Make sure that PDA server is logged on as the Main Server before you start loading Palm software.
- Go into Customer On-line Setup (10.6.x.3) and in field #7 enter in the printer # to print invoices and error reports to by location and save it (must be a numbered printer in the system and not a slave printer). Next go into field #8 and type in FILE then Save your changes. If you get a warning message, just press <ENTER> Then Stop and Start the Import Transfer Process (10.6.1.12) and check status in 10.6.2.11.
- Create Customer On-Line Codes automatically in 10.6.x.4 from the existing customer base. First select location or all, then Customer Sort Code or <ENTER> and type in Salesperson of Record (if you want limit by salesperson) or press <ENTER>. When you are done press <C> <ENTER> and it will create all the customer codes that the Palm unit needs to operate.
- Now go to the Customer On-Line menu (10.6.x) and create the PDA type (10.6.x.6). Type <PDE> and press <ENTER>:
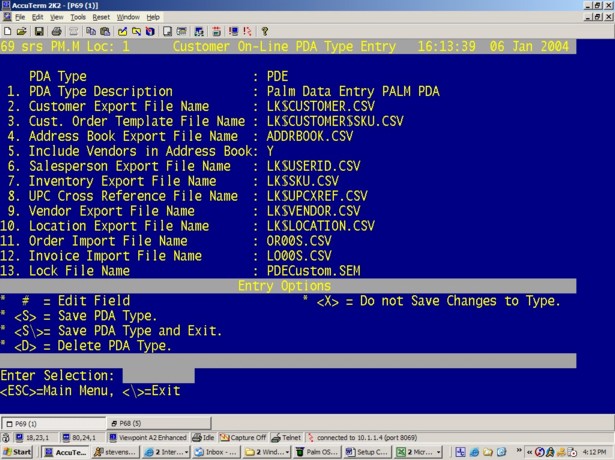
*Double check and make sure that it is spelled exactly as it appears here.
- Create at least one PDA code for each Palm OS device.
PDA Code Entry (10.6.x.5)
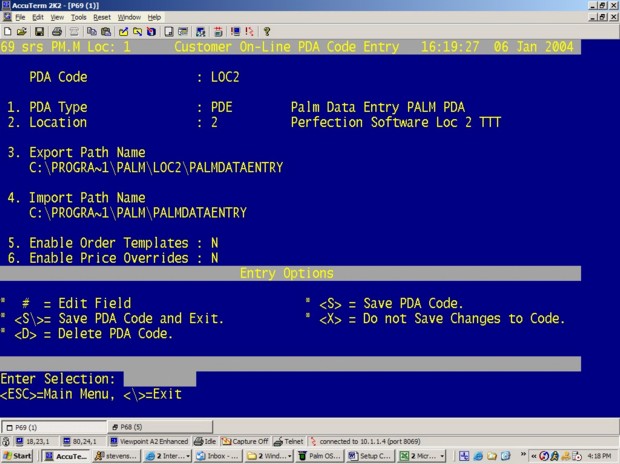
PDA Code : LOC2 *Enter in a User or Location code (JOE or LOC2)
1. PDA Type : PDE Palm Data Entry PALM PDA
2. Location : 2 Auto Color Loc2
*Leave blank to default to the Customer On-Line Default Location, then if that is blank the system will use the Customer Servicing Location setup in Customer Entry (6.1.1). It is recommended that you leave this field blank unless the PDA will actually represent an inventory stocking location like a mobile truck.
3. Export Path Name
C:\PROGRA~1\PALM\LOC2\PALMDATAENTRY
4. Import Path Name
C:\PROGRA~1\PALM\PALMDATAENTRY
NOTE: If setting up on the Main Server and when pathway includes a sub-directory with a name greater than 8 characters you must substitute using DOS naming. For example: C:\Program Files\Palm would translate to C:\Progra~1\Palm.
5. Enable Order Templates: Y or N
6. Enable Price Overrides: Y or N
- Once PDA codes are entered and download paths are correct, the export files for Customers and Inventory need to be created. These files will download into the appropriate folder on the PDA server and will be uploaded on the next HotSync to the Palm OS device.
Create Customer Export (10.6.x.7)
COL PDA Code : LOC2 Type : PDE - Location : 1
Export Path : C:\PROGRA~1\PALM\LOC2\PALMDATAENTRY\LK$CUSTOMER.CSV
List Name : List Name *Enter in list name to limit customer list or press <ENTER>
Servicing Location : 2 Auto Color Loc2
Customer Sort Code : ALL *Enter customer sort to limit customer list or press <ENTER> for all
Salesperson of Record : ALL *Enter salesperson code to limit customer list or press <ENTER> for all
Ignore Cust's on Hold : N *Enter <Y>es or <N>o to limit number of customers by hold status
* Type a <C> <ENTER> and the download process will start.
Create Inventory Export (10.6.x.8)
COL PDA Code : LOC2 Type : PDE - Location : 1
Export Path : C:\PROGRA~1\PALM\LOC2\PALMDATAENTRY \LK$SKU.CSV
List Name : List Name *Enter List Name generated at TCL.
Status : A *Enter part# status to limit by <A>ctive, <I>nactive or <O>bsoete
Mfr Sort Code : ALL *Enter mfr sort code to limit inv list
Group Code : ALL *Enter group code to limit inv list
Price Code : 5 Refinisher *Enter price code to pull prices from
Past Month's History : 36 *Enter number of months of sales history to only pull actively selling inv.
Popularity Code : ALL *Enter pop code to limit inventory list
History/Pop Code Loc/Reg : ALL *Enter Loc or Reg to use for Sales History and Pop Code Selection
* Type <C> <ENTER> and the download process will start.
* Note: Batch Processing can be used to automate the Create Cust. & Create Inv. Exports. This option is only available on Windows versions of PM.
- Create File Link for Palm Address Book:
- Open Palm Desktop, click HotSync>File Link> then next to create a new link
- Click Application Name (Address Book), File Path is C:\Program Files\Palm\User \PalmDataEntry ADDRBOOK.CSV and Category Name is PM then click Next
- Click OK to accept Import Fields and Done
- Click on Address icon then on Tools>Preferences> and label the Custom fields (Label 1: Salesperson, Label 2: Service Loc, Label 3: Credit Limit and Label 4: Hold) then click Ok
- Click on View>Sort By>Company,Last Name
- Turn on the Palm OS device, click on Address icon then click on Address (top left) Options>Preferences>
- Uncheck Remember Last Category then click on Company, Last Name and Ok
- When export files are complete, you will see them in the PalmDataEntry folder then click HotSync in the Palm or push the HotSync icon button on the cradle and the data will upload to the Palm OS device.
- Once data is loaded, create a sample order and HotSync again to test that it is going to the PalmDataEntry folder. It should create a Quote order that will print on the assigned printer that you chose in 10.6.x.3. If this does not happen then use troubleshooting procedures on following pages.
Final Thoughts:
- It is important to understand that you need to schedule HotSync sessions (especially if you have more than one PDA and someone is dialing in through a modem). Only one PDA is allowed to HotSync at a time.
- If doing a HotSync through the Internet, you must load Palm Desktop locally on your PC, the main must have a static IP address and the router must be setup to forward ports 14237 and 14238 to the PDA Server. Follow the procedure to Setup Network Hot Sync through the Internet.
- If doing a HotSync at home, you must use the ACCU: feature in PDA Code Entry (10.6.x.5) to export files to their home PC. You will need to first download orders by modem then log into the Main and use AccuTerm to create the customer and inventory files then HotSync locally from their PC. This has to be done manually; batch processing cannot be used in this case.
- If you are connecting the Palm to a remote PC then share the Palm folder (Program Files>Palm) on the PDA server and create a mapped network drive from the Main Server to that folder. Make sure that both Main Server and PDA Server are logged in under the same windows User and Password. Open Explorer on Main Server and go to TOOL > MAP NETWORK DRIVE then pick P as the letter then click on browse. Browse to the PDA server and click on the Palm folder and click Ok then Finish.
- If you would like the export files to be created automatically then you can use Batch Processing 10.10.1. File names are CREATE.CUST.EXPORT and CREATE.INV.EXPORT, the input for customer is PDA name, 5 enters and C and the path for inventory is PDA name, 8 enters and C. Put both on phantom ports and tell customer to make sure they do a Hotsync every day.
- If the system is automatically creating bar codes for you then, you will need to set that up in Batch Processing as well. File name is CREATE.BAR.CODE, the input for the program is just 1 enter for all mfrs. Put this on phantom port and set for midnight.
- When a PDA’s battery is very low it must be changed within 1 to 2 minutes or any orders on the Palm OS device will be lost.
Troubleshooting:
- If OR00S.CSV file does not upload to the Main check these areas:
- In TCL, do LIST-JOBS to see if the transfer process is running
- Also in TCL, type in SHL COL.TRANSFER.POS to see the transfer process only on screen. Look for any error messages.
- In DM, do a CT MD USER-COLDSTART to see if the SHL COL.TRANSFER.POS process was added.

