|
Bank Reconciliation
|   |
|
Bank Reconciliation
| |
The Perfection Software Bank Reconciliation program allows you to balance your system “bank” with your bank statement. The Bank Reconciliation Program (7.7.3) has an “auto-save” feature that saves changes immediately. There is no traditional save function, everything is done immediately.
In this document, the term “bank” refers to the system bank (i.e. banks listed in the computer). The term “statement” refers to the paper bank statement you receive from your bank.
If you are not currently using Accounts Payable and Payroll to write checks through the system then you will not get much benefit from using this new system. Also, this program assumes you have a valid Bank General Ledger account with an accurate balance in the system and you are following good procedures to keep your system in balance.
The Bank Reconciliation program requires an initial setup. These one-time setups must be done before you start reconciling your bank with your statement.
Included in this document are the following:
I. Bank Reconciliation Initial Setup
Before beginning to use the Bank Reconciliation program you must first setup the following programs: Chart of Accounts, General Ledger Setup, Accounts Receivable Setup, and Banks. Usually this is a one-time setup. Please refer to your manual for more detailed instructions.
1. Chart of Accounts Entry (8.4.1)
The Chart of Accounts must be created for each Bank. Even if you do not use the Financial Reports or other General Ledger features of Perfection Management, the Cash in Bank account must be created in order for the Bank Reconciliation program to run.
The dollar amounts for Cash in Bank accounts must be accurate. If incorrect, you may fix the amount by doing a Journal Entry (8.1.1).
Important! You must have procedures in place to maintain the bank account to be able to reconcile your bank.
2. Accounts Receivable (10.2.2.1)
The Accounts Receivable Setup must be done for each location.
Make sure your Cash account is correct. All Cash Sales, Payments on Account and Paid-Outs will be posted to this account.
HELPFUL HINT: You should create your bank deposit slips based on a Batch. Post the batch and then make the deposit. Staple a copy of the deposit slip on the proof report. Now you will be able to match the individual items to a specific deposit on the Statement.
3. Bank Entry (7.7.1)
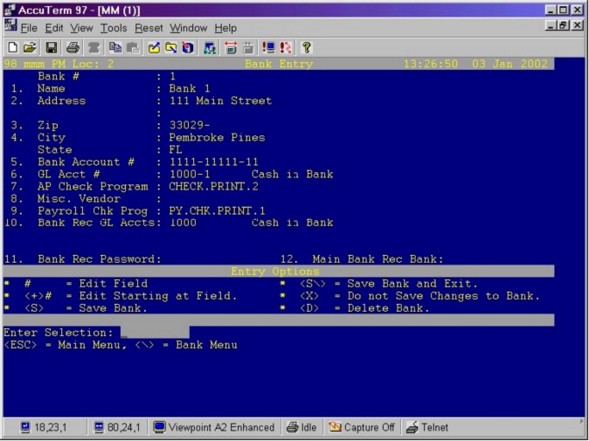
The Bank Entry must be setup for each Bank Account. Certain items are required before beginning the Bank Reconciliation program.
Item 6. General Ledger Account Number – Enter in the Cash in Bank account number for this bank. The location is required, example 1010-1 for location 1. If this is the account for all locations then be sure to enter the account if field 10 below (ex: 1010).
Item 10: Bank Reconciliation General Ledger Account – Enter the General Ledger Accounts to be included when doing a Bank Reconciliation for this bank. This item is used if you want to track other locations or accounts at this Bank. If you have only one location, enter the General Ledger Account number without the location. That way if locations are added in the future, this item will already be setup. NOTE: Be sure to setup an account in one bank. The system only looks at the first bank that the account is listed in. For example if account 1010 is listed in Bank 1 and Bank 2, the system will only capture the account in Bank 1 unless item 12 is setup.
Item 11: Password – This password will be prompted for when this bank is entered in the Bank Reconciliation program. The password will not be shown on the screen. To change or delete the password, you must type in the original password for verification.
Item 12: Main Bank Reconciliation Bank - Enter a Bank to post all bank reconciliations for this Bank. This item is used when you have more than one bank number that you want tracked under one Bank number. Specifically, if you setup a different Direct Deposit Bank number from your regular Payroll Bank Number, and it is actually the same bank account then you would want all transactions for both bank numbers to be reconciled together.
4. Rebuilding Bank Reconciliation (TCL)
This next step is done only one time, just prior to doing your first Bank Reconciliation. This process will automatically setup any outstanding bank reconciliation items, based on the date entered. If this process does not select all UN-reconciled checks then you will have the option of setting up items individually.
At the Main Menu, enter TCL and press <ENTER>.
WARNING! This will clear all of the Bank Reconciliation files and reinitialize any work that may have been done on the system. Do not do this more than once unless specifically instructed to do so.
At the colon (:), type REBUILD.BANK.REC and press <ENTER>. (Don’t forget the periods between the words.)
Enter Date to select back to for Rebuilding BANK.REC file :
Enter the Date to select back to for Rebuilding the Bank Reconciliation file and press <ENTER>. This will automatically select the deposits and checks back to and including the dates entered. It is recommended to go back three months and use the first of the month. (Ex: if the date is Jan 15, 2002, enter the date 10/1/2001).
Do you want to select All Checks that are UN-reconciled. Answer <Y>es only if
you are currently doing Check Reconciliation in the system :
Answer <Y>es only if you are currently using Check Reconciliation in the system. If a Yes is entered, the process will setup all checks that are UN-reconciled in the Bank Reconciliation program. If you are not currently using the old Check Reconciliation program, just press <ENTER>.
WARNING! Make sure you do NOT Post Journal Entries during this procedure.
Enter <R> to Clear out the BANK.REC file and Rebuild :
Enter <R> and press <ENTER> to clear out the Bank Reconciliation file and Rebuild. This process may take a few minutes depending on how many checks and journals are in your system and the options selected.
When the process is finished, you will see the colon (:). At the colon enter an <M> and press <ENTER>. You will now be at the Main Menu.
The Setup process is not complete until you go into the Bank Reconciliation program (7.7.3) and verify the outstanding items are accurate for your bank.
You should first print a report of outstanding items and verify that everything on the list is indeed outstanding. If there are items that do not belong then either Reconcile the individual items or Move them to another bank. If there are missing items then all you have to do is UN-reconcile those items to bring them into the Bank Reconciliation Entry program. You can only UN-reconcile checks so if deposit items (journals) are missing then you will either have to run the setup program again with an earlier date or just reconcile without those items the first time.
The first reconciliation will be a challenge but once you have the program running it should save lots of time when it comes to reconciling your bank statement.
II. Bank Reconciliation (7.7.3)
Only items that are posted will be displayed in the Bank Reconciliation program. Be sure to post all Checks and Journal Entries.
There are a few things that you need to have before starting to do Bank Reconciliation. The first is the Statement you received from the bank. Be sure to check the statement for any bank fees. If there are any transactions that are not in the system, do a Journal Entry to enter it in the system. Don’t forget to post the entry.
Start the Bank Reconciliation Program (7.7.3) and then enter the Bank number you are reconciling. If you entered a password for this bank then it will be prompted for now.
Next you will see a prompt for the “Statement Ending Balance.” The amount of the last Ending Balance will be displayed; this is your new Statement’s Beginning Balance. Type over the amount with the new Ending Balance. You must enter in the decimal point after the dollar amount to enter the cents.
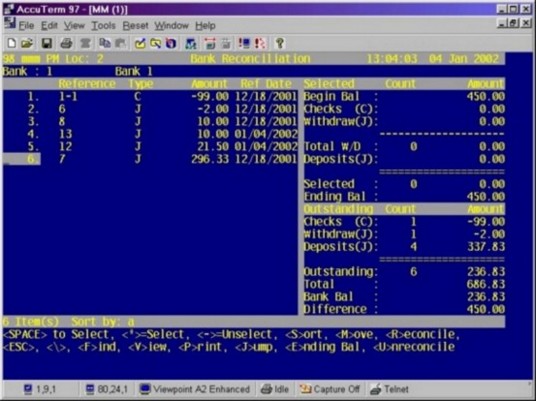
Now let’s look at the Bank Reconciliation screen. As you can see it is broken down into three sections: Reference, Statement Amounts, and Outstanding Amounts. As you select or “reconcile” items in the Reference Section, the Statement Amounts and the Outstanding Amounts sections will be updated.
HELPFUL HINT: Nothing is finalized until you press <R> to reconcile. Even if you do reconcile you can easily UN-reconcile to bring the item back.
Reference Section
The Reference Section consists of all the transactions – checks, deposits, and journal entries; that have been posted but not previously reconciled. Listed below the Reference Sections are instructions on how to Select, Unselect, Sort, Move, Reconcile, Escape, Find, View, Print, Jump, Enter Ending Balance, and Unreconcile.


The first number listed is the item number. The Reference Number is the Journal Entry or Bank-Check number.
There are two types of items on your Statements – Checks/Debits and Deposits/Credits. This is also true for the Bank Reconciliation program. The “J” refers to a Journal Entry. The Journal Entry may have been created because of an Invoice (1.1), AR Payment Entry (6.4.1), Adjustment (6.5.1) or a manual Journal Entry (8.1.1). Remember, all items must be posted before it is included. In the case of an Invoice, you must first post your Invoices, and then post your Journal Entries.
Items that are Debited or deducted from your bank are listed as negative amounts – example: checks and bank fees. Items that are Credited or added to your bank are listed as positive amounts – example: payments.
Now you are ready to Select items from your “Bank” to be Reconciled. Using your Statement, Select the items on the screen that have been cleared from the bank.
To Select an individual item – Place the cursor at the number of the item to be Selected and press the SPACE BAR. An “S” is entered in front of the Reference Number and the line is highlighted.
To Select a Range of items – Enter the asterisk (*). You will see the prompt: “Enter Range to Select (ex. 1-99).” Enter the beginning item number in the range, followed by a dash (-) then the ending item number in the range. Example: 2-6 will select item 2 through item 6.
To UN-Select an individual item – Place the cursor on that item and press the SPACE BAR.
To UN-Select a range of items – Enter the dash (-). You will see the prompt: “Enter Range to Un-Select (ex. 1-99).” Enter the beginning item number in the range, followed by a dash (-) then the ending item number in the range. Example: 3-5 will un-select item 3 through item 5.
Sort the items by Selected, Reference, Type, Amount or Reference Date – By default items are sort by Type then Reference. Once you change the sort sequence the program will remember the setting. Enter an <S> to Sort. Next, enter the letter of how you want the items Sorted. You may select more than one way to Sort – If you want to sort by Transaction Type then Reference Number; enter a T followed by a space, then a R. Sort By: T R will then appear in the highlight bar at the bottom of the screen. The following is a list of sort options:
S = Sort by Selected Items
R = Sort by Reference Number
T = Sort by Transaction Type (J or C)
A = Sort by Amount – Highest negative amount to highest positive amount
D = Sort by Reference Date
Move an item to another Bank - Enter <M> to move. You will see the prompt: “Move Current Item or Selected Item” if items are selected. Enter a <C> to move the item that the cursor is at, or enter an <S> to move “Selected” items. The items will be removed from the current Bank to the selected Bank. This will be useful when items get posted to the wrong bank.
Find an Item by Reference, Type or Amount - Enter <F> to Find. You will see the prompt: “Enter String to find Reference, Type and Amount (do not use decimals).” A “String” is a character (number or letter). The system will search all three columns – Reference, Type and Amount. Example – to Find a check for $10.00 – enter 1000. The Find feature will look at the first item that the cursor is on and search down. Be sure to be on the first item to search all items. Use the <J>ump feature to quickly move to the top.
View the Journal Entry or Check Entry for the information on the item - Place the cursor on the item you want to view. Enter <V>. The screen will now display the Journal Entry or Check View. To return to the Bank Reconciliation screen, press <ESC>.
Print the items selected or all items - Enter <P> to Print. Then enter <S> to only print Selected items or <A> to print All items.
Jumping to an item - Enter <J>. Now enter the item number you want to go to. The cursor will now be at that item.
Re-enter the Ending Balance of the Statement at any time - Just press <E> and then the new amount. Remember that you must enter the decimal point for the amount.
Once you have selected all the items and checked the amounts with the Statement Amounts and Outstanding Amounts Section (explained below), you are ready to Reconcile the Selected items.
Reconciling - Enter <R> to reconcile. Please note that you can UN-reconcile if items are reconciled in error. If items are selected you will be prompted to Enter <C> to reconcile the current items your cursor is positioned on, or <S> to reconcile selected items.
Enter <Y> and press <ENTER> to Reconcile.
The items will be removed from the screen but not from the system.
UN-reconciling – Enter <U> to UN-Reconcile any item. This puts the items back on the screen. You now have a choice on which item(s) to Unreconcile.
Individual Check – Enter <C>. Enter the whole check number, which includes the location number plus the check number (example – 1-565 is check number 565 from location 1), then press <ENTER>. The date the check was reconciled will be displayed. Enter <Y> to Unreconcile.
Journal Entry – Enter <J>. Enter the Journal Entry number that was listed in the Reference section. The date the Journal Entry was reconciled will be displayed. Enter <Y> to Unreconcile.
Reconciled Date – Enter <D>. This is the date the item(s) were Reconciled on, not the Reference Date. Enter the Reconciled Date and press <ENTER>. The number of items Reconciled will be displayed. Enter <Y> to Unreconcile.
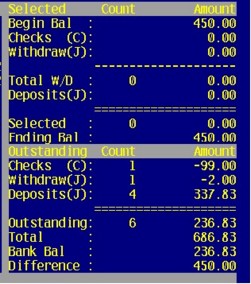
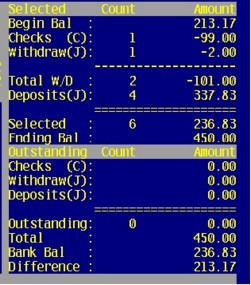
Statement Amounts & Outstanding Amounts Section

![]()
![]()
The Statement or Selected Amounts and Outstanding Amounts Sections will be looked at together because they interact. As items are selected, the amounts are added or subtracted from the Amounts Sections.
Statement or Selected Amounts: When the “Ending Balance” is entered, the amount is displayed in the Statement Amount Section in the Ending Balance and the Beginning Balance. As items are Selected, the Beginning Balance changes to reflect the amounts entered. When finished, the Beginning Balance and Ending Balance should match your Bank Statement.
Beginning Balance – Statement Beginning Balance. Changes as items are selected.
Checks – Amount of Checks Selected.
Withdrawals – Amount of negative Journal Entries (Ex: bank fees)
Total W/D – Checks + Withdrawals
Deposits – Amount of positive Journal Entries
Selected – Totals of the Selected Amounts (Deposits + Total W/D)
Ending Balance – Statement Ending Balance
Outstanding Amounts: This section shows the totals of the checks and journal entries listed in the Reference Section that are not selected.
Checks – Amount of Checks that are not selected.
Withdrawals – Amount of negative Journal Entries that are not selected
Deposits – Amount of positive Journal Entries that are not selected
Outstanding – Checks + Withdrawals + Deposits
Total – Ending Balance + Outstanding
Bank Bal - The bank balance of all the General Ledger Accounts setup for this bank.
Difference - Total – Bank Bal.
The Difference should be zero before you <R>econcile your work. This essentially means you are in balance.