|
PPG EPO Installation
|   |
|
PPG EPO Installation
| |
Installation Instructions and Users Guide
11/10/2008 v.19.1
The Perfection Software Electronic PO Transfer system allows you to transfer your Purchase Orders directly to your vendor.
Minimum Requirements
The following are minimum requirements necessary to run Electronic PO Transfers. Please get all of the following items from Perfection Software, Inc. before starting.
Once the minimum requirements are met, you are ready to begin. Please call Perfection Software, Inc. if you have any questions at 800-766-7530.
The Electronic PO Transfer program requires an initial setup. After setup, you may begin transferring your Purchase Orders through your dedicated Internet connection.
Included in this document is the following:
Vendor Setup........2
Electronically Transferring a Purchase Order........7
Transmission Results........8
View Status........9
Please read these instructions entirely before starting the installation.
Vendor Setup
The Perfection Software Electronic PO Transfer depends on setups made in the Vendor Entry program. Certain entries must be made before a transfer can take place. In Perfection Management, go to Vendor Entry (7.6.1 or 3.5.1.1), page 2-4, entries 19-30. Be sure to Save the Vendor Entry when you are done.
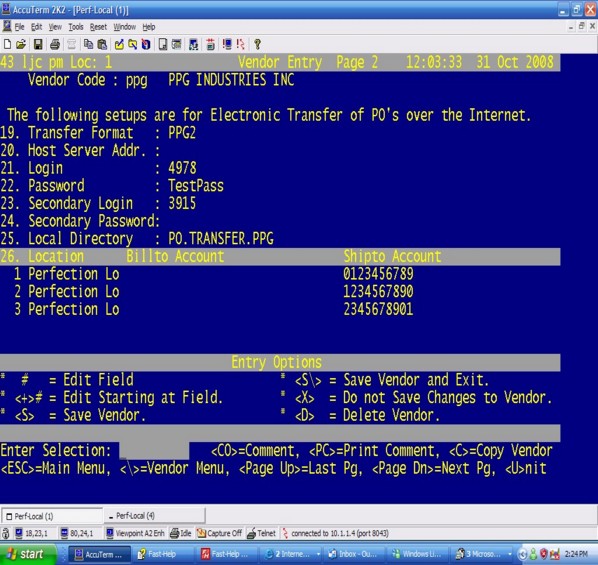
When Testing : TEST
When you go Live : (Leave blank)
Enter the above file for PPG. There may be other vendors using this program so please contact Perfection Software, Inc. if there is any question.
Billto Account # and Shipto Account #: The Billto and Shipto Account Numbers are unique to your business. This is the customer’s main account number from the vendor. If Billto is left blank then the Shipto Account will be used, and if that is blank the regular vendor account (field 1 Page 1) will be used. Please contact your Vendor for these numbers. Note: only the first 8 digits of the number entered here will be used when transmitting the PO to the vendor.
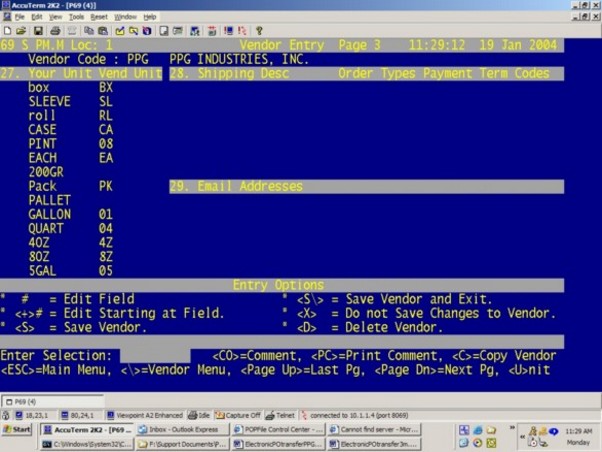
The Vendor Unit lists the Units of Measure for the Vendor’s part numbers. This gives you the ability to cross-reference your unit to your vendor's unit if necessary.
To Build Your Unit List: At the <ENTER SELECTION> prompt at the bottom of the screen, enter a <U> and press <ENTER>. This procedure may take a while depending on the size of your system.
The following is a sample list of Vendor Units to put in for PPG. If you leave the Vendor Unit blank then the program will just use Your Unit when transferring the PO.
SAMPLE list of Units of Measure: When there is more than one choice for each unit, it is best to choose the first unit of measure listed, but be aware that it may not match a for a particular part number.
|
Your Unit |
Vendor Unit |
|
Your Unit |
Vendor Unit |
|
.28LTR |
C3 |
|
AERO |
C4 |
|
.40LTR |
E3 |
|
ASSY |
AY |
|
.5LTR |
HL |
|
BAG |
BG |
|
1 OZ |
1Z |
|
BLOCK |
BL |
|
1.20KG |
H2 |
|
BOTTLE |
BO |
|
1.3KG |
H9 |
|
BOX |
BX |
|
1.5KG |
H3 |
|
BOX |
B5 |
|
1.5KG |
3P |
|
BOX |
1P |
|
12X375 |
Y7 |
|
BOX |
B2 |
|
13ZCAN |
DZ |
|
BULK |
00 |
|
16GAL |
06 |
|
C2 |
C2 |
|
190LTR |
T1 |
|
CAN |
CN |
|
190LTR |
U3 |
|
CASE |
CA |
|
190LTR |
26 |
|
CRTDGE |
CQ |
|
190LTR |
T2 |
|
DISC |
DC |
|
1LITER |
N1 |
|
DISP |
DI |
|
2OZ |
2Z |
|
DRUM |
U2 |
|
2KG |
K4 |
|
DRUM16 |
06 |
|
2KG |
K1 |
|
DRUM53 |
55 |
|
2.2KG |
K2 |
|
EACH |
EA |
|
2.5KG |
N2 |
|
GALLON |
01 |
|
2.5KG |
E2 |
|
GAL |
M2 |
|
200LTR |
U1 |
|
KIT |
KT |
|
20LTR |
20 |
|
LITER |
N1 |
|
2-2KG |
Y6 |
|
LITER |
E1 |
|
25LTR |
25 |
|
LITER |
1U |
|
3KG |
L1 |
|
LITER |
1L |
|
3.5LTR |
N3 |
|
LITER |
1C |
|
375ML |
D3 |
|
LITER |
G7 |
|
3LITER |
3L |
|
N5 |
N5 |
|
3OZ |
3Z |
|
PACK |
PK |
|
4OZ |
4Z |
|
PAD |
PD |
|
40LBS |
B4 |
|
PAIL |
05 |
|
4LITER |
N4 |
|
PINT |
08 |
|
4LITER |
41 |
|
PKG |
PK |
|
5GAL |
05 |
|
PROD |
00 |
|
50LBS |
B5 |
|
QUART |
04 |
|
50LBS |
B3 |
|
ROLL |
RL |
|
55GAL |
55 |
|
SET |
ST |
|
5LITER |
E5 |
|
SLEEVE |
SL |
|
6OZ |
6Z |
|
|
|
Enter your unit of measure once and then enter your vendor's unit of measure that will apply to the majority of your part numbers.
Then for those part numbers where the unit of measure does not translate properly using the cross reference, there is an option to translate unit of measure by part number. This is setup in Costs and Prices Entry in the source part number field for this vendor (5.1.2 field 1 Source Part Number) by entering the part number only followed by U: and the correct vendor unit of measure.
For example: if the part number is PPG.123 with a unit of LITER and the vendor's unit is E1, you would enter 123 U:E1 in the source part number field for this vendor.
This entry is Vendor specific. LEAVE BLANK. This field is not used for PPG at this time. If you want to communicate special shipping instructions, put these instructions in the Special Instructions or the Comments of the PO.
When you enter <?> you get the following help.
The following functions are available for converting your data during an Electronic PO so that it matches your vendor's part number. The function should be entered followed by a Part Number or Manufacturer Code then any specific parameters.
CONVERT
- Ex. CONVERT PPG "-" TO "" (This will remove all dashes in Parts for PPG)
CONVERTU
- Ex. CONVERTU PPG "-" TO "" (Remove all dashes in Units for PPG).
DROPUNIT
- Ex. DROPUNIT PPG (This will drop all units for PPG)
PREFIX
- Ex. PREFIX PPG 020 (This will prefix 020 to the front of every PPG part)
POSTFIX
- Ex. POSTFIX PPG 00 (This will postfix 00 to the back of every PPG part)
These functions will be applied when sending Electronic Po's in PO Entry.
Use these Conversion Functions along with Source Part Number (see example in screen shot below) setup in Costs and Prices Entry (5.1.2) to match any vendor part number.

Additional Setups:
The following setup needs to be done at TCL and should only be done with the guidance of Perfection Software, Inc.
U MASTER PS
Attribute 1 : (leave it alone) (Not used by PPG)
(ex. perfectionsoftware.hopto.org when setup for another vendor)
(We are using the new Perfection Util Service for PPG)
Attribute 2 : Perfection (Sender Credential ID)
PerfectionTEST (use this when testing)
Attribute 3 : testpw (Sender Credential Password)
PO Acknowledgements and Advance Shipping Notices are now being provided by PPG. The following setups allow your system to download these transactions from Perfection Software, Inc.
In Customer On-Line Setup (10.6.x.3). Do not change any other settings.
Note: if Customer On-Line is not installed on the customers system then it must be purchased and installed prior to this setup.
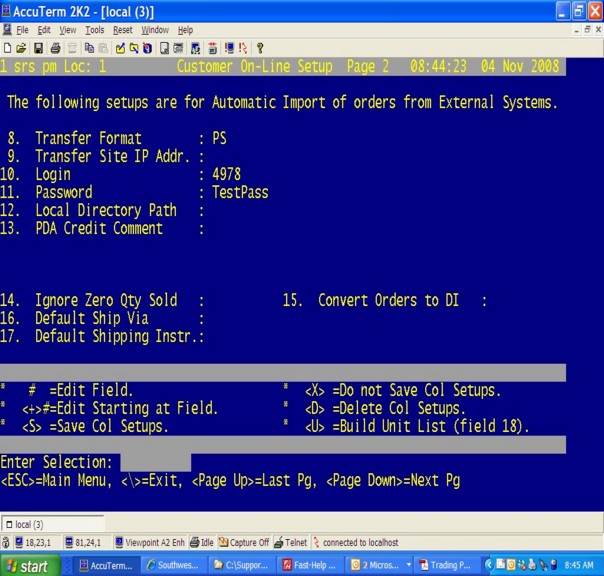
8. Transfer Format: PS
10. Login: Perfection Software, Inc. assigned login for this customer. (From Credential Domain).
11. Password: Perfection Software, Inc. assigned password. (From Credential Password).
The Perfection Util Service
In Windows, install the Perfection Util Service v20 or above (PerfectionUtilServiceV20.msi) and the .NET Framework 2.0. If the program is installed on the C:\ drive then no additional setups are necessary. If another drive letter is used then you must edit the following MD entries and change the drive letter in attribute 3.
Note: If running on a Linux server, then Linux would have to setup to see a Windows machine using Samba and then attribute 3 would have to be setup to point to the Windows directory.
:U MD PSWSPOST
MD 'PSWSPOST' size = 86
01 Q
02
03 DOS:C:\Program Files\PerfectionSoftware\PerfUtilService\PSWSPost
:U MD PSWSPOST.RESULTS
MD 'PSWSPOST.RESULTS' size = 102
01 Q
02
03 DOS:C:\Program Files\PerfectionSoftware\PerfUtilService\PSWSPost\RESULTS
In windows edit C:\Program Files\PerfectionSoftware\PerfUtilService\PerfUtil.exe.config to configure the service if the default settings have to be changed.
To start the services open the Windows Services applet and start PerfUtilService. If there are problems starting the service refer to Event Viewer in windows and view the logs in C:\Program Files\PerfectionSoftware\PerfUtilService\Log.
The Perfection Web Server
The customer must also be setup in the database on the Perfection Web Server. Use the same Login and Password that is setup in Customer On-Line. Also, if the customer wants email notification when Order Acknowledgements and Advance Shipping Notices are returned from PPG then setup the email address also.
Congratulations, setup is completed. You are ready to proceed with electronically transferring a Purchase Order.
Electronically Transferring a Purchase Order
Electronic PO Transfers are done in the Purchase Order entry screen (3.2.2 from the Main Menu).
Below are the steps for electronically transferring a Purchase Order.
Shipping/Payment Terms: If there are special shipping instructions or special terms available (Ex. Promotional terms), put these instructions in the Special Instructions or the Comments of the PO. All comments will be displayed to a customer service representative (CSR) and the shipping organization. This provides a means to communicate directly to the people servicing the order. Comments can be used to communicate specifics about the order (Order X is a part of a split order), they can be used to send special shipping instructions (Will pickup order at warehouse), or any other information that PPG should know about the order. NOTE: There is a limit to the number of characters (108 at this time) that PPG will accept so be brief with your comments. If they receive more than 108 characters, the comment will be truncated and some of your instructions may be lost.
Electronic PO: At the Purchase Order Enter Selection prompt, enter an <E> and press <ENTER>. NOTE: This option is only available on Released Purchase Orders.
The PO will be transmitted or you will get the following options if the PO has already been sent one time:
PO Already Transferred. PO Status => Released.
Enter <S> to Send again, or <V> to View Status:
See View Status example below.
The Purchase Order will now transfer. You will see a message “Now Transferring Via PPG2 Please Wait” Once completed the results of the transmission will be displayed. If successful, you will receive a "SUCCESS" message. If you do not receive this message then your PO did not transfer properly. Make sure your Internet connection is functioning properly. If everything checks out then please call Perfection Software Support.
See Transmission Results example below.
To get a report of your Electronic Po’s the Outstanding Purchase Order Report (3.2.3) gives an option to print PO Status on the report. This will give a quick view of the status of all your outstanding Po’s. Use option <E> on the report.
Transmission Results
Once the transmission has been sent, the results of the transmission will be displayed.
Below is an example of a “result” of a transmission.
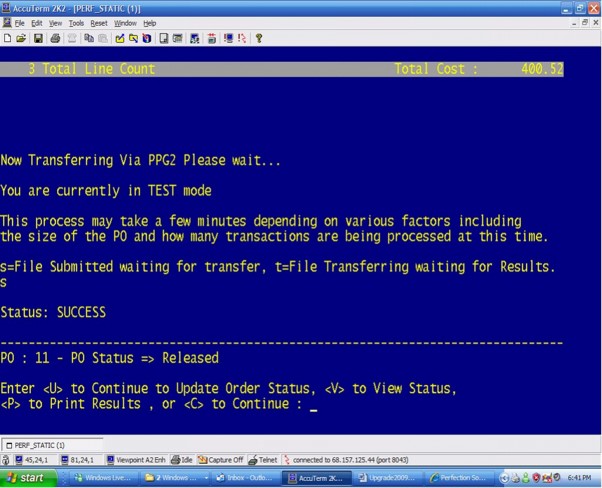
You then have a choice of <P> to Print or <C> to Continue.
View Status
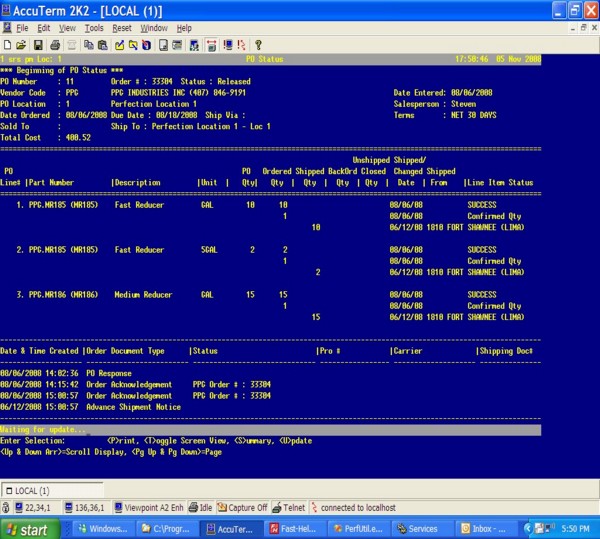
If this Purchase Order has already been transmitted to your vendor enter <V> to View PO Status. This screen will show history of the Electronic PO transfers.
Enter <P> to print.
Enter <T> to Toggle between wide screen and regular screen view.
Enter <S> for Summary Mode. If in Summary mode, enter <D> for Detailed mode.