|
ACH Setup
|   |
|
ACH Setup
| |
REQUEST:
Perfection Software received a request for an automated check payment system. This process will allow for automatic bank to bank transfer of funds for both payroll and payable items. The method used to achieve this for payable items is to embed EDI formatted data inside of an ACH transmission.
PROCESS DESCRIPTION:
This process will allow for Payroll Direct Deposit as well as Automatic Payables checks .
1. REVIEW PROCESS
The first step in the process is to define the type of transactions and the business entities involved. This will include the Sender, Sender’s bank, Receiver, Receiver’s bank, developer (Perfection Software), and any parties required for testing. Requirements will be defined by both the sending bank and receiving banks. The items which will need to be defined come from the “ACH INPUT AND SPECIFICATIONS (File Delivery, Terms and Formats)” manual found in the NACHA Corporate Rule Book.
2. SETUP
Once the nature of the transfers has been determined there are a number of setup items that will need to be completed before using this process. Below we will define these items and instruct you on how to maneuver the menus to input these requirements. In addition to the available setup items there are numerous items that will be determined during the REVIEW PROCESS that are currently embedded in the code at this time. It should be noted that if a customer wishes to switch their sending bank or enable new clients that additional programming may be required on the part of Perfection Software Inc.
We can break the setup items into three sections:
A.) General Setups
There is a file called ACH.TRACKING that has the status of each transmission. Using this file in conjunction with the new fields ACH status and ACH ID in the CHECK file will allow for tracking transmissions. The ID to the ACH.TRACKING file matches the ID to both the ACH.DATA file and the EDI.DATA file.
B.) ACH Setups
There are a number of new ACH related fields. The data will need to be setup in the following entry programs:
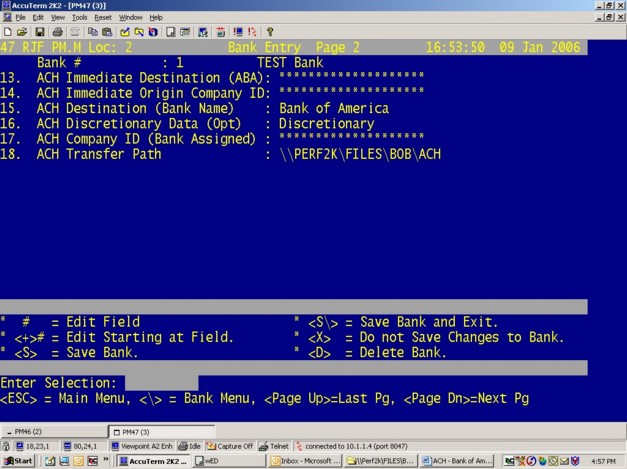
BANK ENTRY (7.7.1) Page 2 Fields 13-18
EMPLOYEE ENTRY (9.3.1) Page 3 Fields 31-33

PAYROLL SETUP (9.4.2) field 18:
Enter the ACH bank number in this field.
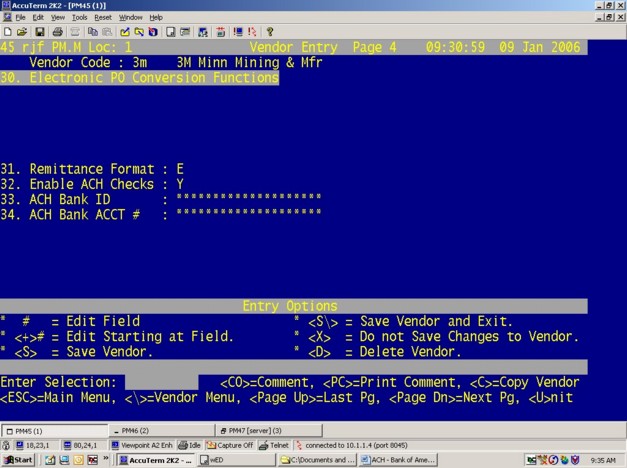
VENDOR ENTRY (7.6.1) Page 4 Fields 32-34
C.) EDI Setups
At this time the EDI setups are being manually entered into the EDI.SETUP file.
Refer to the VARFILE EDI.SETUP for required entries.
The ID is the Vendor or Employee Code.
3. PROCESS FLOW / USER INTERFACE
Payables and Payroll Checks are processed normally with two exceptions.
1.) You must enable ACH in the Employee or Vendor setup process described above. This will prevent the checks from actual printing.
2.) Will create a record that feeds the TRANSMIT.ACH.CHECKS program in TABLES ACH.CHECKLIST record. A value is entered into field 1 when a check is posted.
There is a program called TRANSMIT.ACH.CHECKS located on the Vendor menu (7.9.6) which allows selection of individual or multiple checks from the same bank to be sent to the CREATE.ACH program which will create a downloadable flat file in NACHA format. NACHA is an organization that sets the standards used by automated clearing houses. The first character of each line within the flat file determines the type of record contained on that line. Each line consists of pre-determined fix length information as defined by the NACHA standards. Additional information can be passed in the type 7 records (detail addenda records) in positions 04-83. There can be multiple addenda records per each detail record within each batch. The information that is passed in these records matches the EDI 820 format. We pass blocks of 80 characters after the information is formatted to meet EDI standards in the EDI subroutine which creates a record in the EDI.DATA file. This data is later embedded into the addenda records mentioned above.
TRANSMIT.ACH.CHECKS (7.6.9)
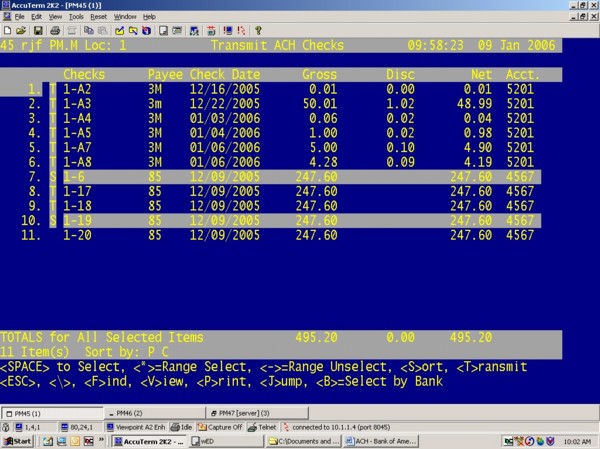
The TRANSMIT.ACH.CHECKS program is populated by the TABLE ACH.CHECKLIST record. The selection process is similar to other processes that already exist on the system. The status of each line item is indicated to the right of the line number. The <T> indicates that this item has already been transmitted. The <S> means that this item has been selected and will be sent on the next transmit. Records maybe selected to be included in the ACH.DATA file by pressing the space bar or selected by range by pressing <*>. Other options available allow section by <B>ank number, <J>ump to specific line number, <V>iew a check, <F>ind a dollar amount within the Gross, Disc, or Net fields. The <S>ort order may also be changed to assisting in selections.
Enter <T> to transmit the ACH file.
The output is placed in a data transfer file ACH.DATA and on the server. The location path of the server file is defined in the bank entry field 18 on page 2. The file is actually created by the CREATE.ACH program which is called from the Transmit ACH Check screen. The key to these records is 9 characters using the format of YYMMDD###. Where ### is a sequential number that starts with one each new day of transmissions.
4. METHOD OF TRANSMISSION
The possible methods of transmission are defined by the sending bank.
Currently we support Bank of America Browser Secured File Transmission over the internet using Internet Explorer. Once a data file has been created and manually reviewed the customer will go to the following webpage:
https://elink-http4.bankofamerica.com/cehttp/html/main.htm
USERID and PASSWORD have been supplied by Bank of America and the process defined in an email which will be provided by the bank.
5. REMOVAL OF TABLE ENTRIES
The check Reconciliation will remove items from the Transmit ACH Checks screen.
6. TESTING
Once the programming has been completed using the specifications outlined above the next step is to submit a test file using the method of transmission determined in the REVIEW PROCESS. Testing will need to be completed on both the transmission of the data file as well as on the receiving side. In the case of payables the EDI format will also need to be tested with the vendor. The EDI format testing can progress simultaneously by emailing the EDI.DATA file to the vendor for review.
Technical Section
Item Type File Item
Program UTIL.PGM CREATE.ACH
Program UTIL.PGM CALC.MOD10.CHKDIG
Program AP.PGM TRANSMIT.ACH.CHECKS
Program AP.PGM VIEW.CHECKS
Program UTIL.PGM CREATE.EDI.820
Program UTIL.PGM ACH.TEST (3M.TEST)
* This is for testing purposes only.
File ACH.DATA
* This is a file on the server and needs to be added to the Bank file record.
TABLE ACH.CHECKLIST
* This record will get populated by the Check Run during the POST.
File ACH.TRACKING
Record VARFILE ACH.TRACKING
Modify VARFILE & DICT BANK
VARFILE & DICT CHECK
VARFILE & DICT EMPLOYEE
VARFILE & DICT VENDOR
VARFILE & DICT EDI.SETUP
* There is a document called “VARFILE CHANGES FOR ACH PROJECT” that has a listing of the added DICT items.
MASTER TRANSMIT.ACH.CHECKS.SORT.BY
* DIM was changed in several VARFILE records so we need to run BASIC QFINDLIST
___________________________________________________
1EDI
EDI (Electronic Data Interchange) is a standard format for exchanging business data. The standard is ANSI X12 and it was developed by the Data Interchange Standards Association. ANSI X12 is either closely coordinated with or is being merged with an international standard, EDIFACT.
2ACH
Automated Clearing House services accept National Automated Cleaning House Association (NACHA) formatted files. All ACH Originators are expected to follow NACHA regulations, which, along with the format, can be found in the Corporate ACH Rule Book.